Unless you are a person born in a Country where nobody uses chairs or you did practice yoga since you were a child, sitting directly on the ground will probably make you feel uncomfortable and after a few minutes you will either be slouching or your back will be sending signals of pain which will compromise your concentration and the meditation session.
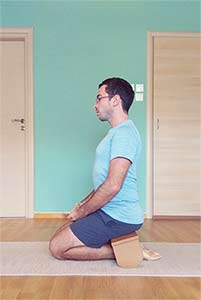
The alternative to the cushion which is used in the cross legged position is the meditation bench. As you have some support under yourself and you are not resting directly to the floor or your heels, your spine can stay still, aligned and relaxed for the meditation session.
Although meditation benches can be costly to buy, it is quite easy to make one with your own hands. And the pleasure of building your own bench for meditation can be a fun and fulfilling process, and of course you will have some positive memories accompanying you every time you see it before you start your meditation session.
The instructions that follow are for a wooden rocking meditation bench, which allows the practitioner to adjust the amount of lean the bench has at any given time for optimal comfort & at the same time it makes it available to use/share for people of different height.
If you would like to learn more about Seiza & Virasana and the meditation postures make sure to check the related article
If you are unsure about the execution of any of the steps it is a good idea to ask a carpenter for help. If you have any doubts about the following steps check the images for clarity.
Materials:
- Wood 1.5X14cm, 78cm total length (MDF is a cheap & good option)
- Wood 7X7cm
- 3/4” wood screws (4 count)
- Wood glue
- Optional: Wood filler
- Wood stain of your choice
Tools:
- Hacksaw
- Optional: Vice & Coping saw
- Ruler
- Pencil
- Sanding block (or sandpaper)
- Screwdriver
- Paper to cut leg pattern
Steps:
- The first step is to cut a small wooden board(14×78) in three pieces, as shown in the following drawing.
- Cut the small wood (7×7) diagonally.
- Begin to Draw the Shape of the Legs Using the Pattern.
- Shape the Legs Using a Saw.
- You will now have two bases and a shelf: Sand them and then apply wood filler, in order to avoid the bench getting dirty.
- Attach the Legs to the Bench (Optional add hinges if you would like to make it a folding bench) – Use glue and attach the screws.
- Attach the wooden brackets to the bench using glue. (Skip this step if you are making a folding bench)
- Optional – Stain the bench.


Namaste